The Acatenango Volcano hike is one of the most talked-about experiences in Central America, and after doing it myself, I completely understand why. Camping at Acatenango base camp and watching Volcán de Fuego erupt in the dark right in front of you is one of those experiences you genuinely can’t get anywhere else in the world. It was one of the highlights of my four months backpacking through the Americas, and I’d do it again in a heartbeat.
That said, I want to be honest with you: this hike is hard. The altitude, the steep incline, the volcanic ash, the fact that you’re doing parts of it in the pitch black at 4am. This guide covers everything I wish I’d known before I went, including what it actually costs, how to book it, how difficult it really is, what mistakes to avoid, and a full account of what to expect on the trail.
Quick Facts: Acatenango Overnight Hike
- What’s often NOT included: National park entrance fee (~100Q), Fuego hike surcharge (~200Q), walking pole rental (~50Q)
- Location: Just outside the city of Antigua, Guatemala
- Summit elevation: 3,976 metres (Volcán Acatenango is Guatemala’s third highest volcano)
- Trail start elevation: 2,200 metres
- Elevation gain: ~1,776 metres
- Duration: 2 days / 1 night (most tours)
- Difficulty: Hard (AllTrails rating) / Intermediate in practice
- Best time to go: Dry season, November to April
- Typical cost: 400-500 Guatemalan Quetzales for a standard tour (~$50-60 USD)
- What’s usually included: Transport from Antigua, guide, tent/cabin accommodation, dinner and breakfast, 3 litres of water

How Hard is the Acatenango Volcano Hike?
This is the question I get asked most, and the honest answer is: harder than most people expect, but achievable for most people with a decent level of fitness.
AllTrails rates it as “hard”, and that’s fair. The trail begins at 2,200 metres, which is already high enough to make you feel breathless before you’ve taken a single step. The first part of the hike is the steepest, exposed to full sun, and the altitude hits you fast. You’re gaining almost 1,800 metres of elevation in a single day, which is above the medically recommended rate of ascent.
That said, in all the groups I saw on the trail, everybody made it to base camp. This is not a technical hike: there are no ropes, no scrambles, nothing where you could seriously fall. It’s steep, sustained, and tiring, but it’s a hiking trail, not a mountaineering route.
The one exception is the summit hike, which takes you through two hours of deep volcanic sand, a bit like trudging up a giant sand dune in the dark. That part is in a league of its own.
My honest take: if you can walk for several hours without stopping, you can make it to base camp. Whether you then do the Fuego hike or the summit of Acatenango is a question of energy reserves and stubbornness.
Best Time to Hike Acatenango Volcano
The best time is during Guatemala’s dry season, which runs from November to April/May. Clear skies mean better views of Volcán de Fuego erupting, a clearer sunrise from the summit, and drier trails.
We did the hike in mid-January and had great conditions. That said, I met someone who hiked in December and had zero visibility and got completely soaked, so there are no guarantees even in the dry season.
The rainy season runs from May to October (also called the wet season). The trail becomes muddier, views are often obscured by cloud, and the overall experience is significantly less rewarding. I’d avoid it unless you have no other option.
How Much Does the Acatenango Hike Cost?
This is where I’d encourage you to read the fine print, because the headline price isn’t always what you end up paying.
Standard guided group tours from Antigua typically cost between 300-400Q (~$38-50 USD). [update with current 2026 prices before publishing] This usually covers transport from Antigua, a guide, basic accommodation at base camp, dinner, breakfast, and your water allocation.
What’s often not included:
- National park entrance fee: ~100Q (~$13 USD)
- Fuego hike surcharge: ~200Q (~$25 USD) if you choose to do it
- Walking pole rental: ~50Q (~$6 USD) per pair (which I’d strongly recommend renting)
We booked the cheapest tour we could find and still ended up paying about the same as people on standard tours once the extras were added. Ask your tour company exactly what’s covered before you book.
Private tours and upgraded accommodation options (some camps offer private cabins or even glamping-style setups) cost significantly more and are worth booking in advance.
➡️ Book the Acatenango overnight hike online here
How to Book the Acatenango Volcano Hike
The easiest way to book is through your accommodation in Antigua. Hostels and guesthouses either run their own tours or have reliable contacts, and you can usually book up to the night before if there are spaces.
Tour operators you’ll hear mentioned a lot include Ox Expeditions and Soy Tours, both of which are well-established. There are plenty of others, though, and quality varies. Asking recent hikers at your hostel is honestly the best source of current intel.
Do you need to book in advance?
For a standard shared tour, no. We booked two days before and had no problem. That said, I wouldn’t leave it any later than the night before, and if you want a private cabin or a private local guide, book ahead.
What should you check is included?
- Park entrance fee
- Walking pole rental
- The Fuego hike (if you want to do it)
- Food (dinner and breakfast are usually included, lunch on the trail is not always)
Altitude Sickness on the Acatenango Hike
Altitude sickness is a real consideration on this hike, and I’ll share my own experience because I made a few mistakes.
The recommendation is to spend at least 48 hours above 1,500 metres before you start the hike, to help your body adjust. Antigua sits at around 1,500 metres, so staying there for two days ahead of time is perfect. We did this, and I still got altitude sickness on the trail, so it’s not a guarantee, but it definitely helps.
On the medication question, I took altitude sickness tablets (Diamox) starting the night before the hike, following the advice of the pharmacist. What I didn’t know was that Diamox is a diuretic, and it had me up to use the bathroom four times in the few hours I managed to sleep. I was running on almost no sleep before the hike had even started. People in our group who only took it if they had symptoms seemed to fare no worse than I did. I’ve been to high altitude several times since and never took the medication again.
If you do get altitude sickness on the trail, drink plenty of water, slow down, rest, and stay calm. Panicking makes it worse. I ended up not sleeping at base camp at all because of it, which made the decision to drag myself out of bed for the 3:45am summit start very interesting.

What to Pack for the Acatenango Volcano Hike
I wrote a full packing list article for the Acatenango overnight hike, so head there for the complete breakdown. The short version:
Don’t leave without:
- Walking poles (non-negotiable, especially for the summit and descent)
- Lots of warm layers including hat, gloves and a scarf
- A buff or bandana to cover your face (volcanic ash on the descent is brutal)
- 3 litres of water (usually provided by your tour)
- Extra snacks and rehydration sachets
- Toilet paper
- A head torch (I didn’t have one for the summit hike and really felt it)
You don’t need to bring: a sleeping bag or tent. These are provided.
🌋 Read more: What to Pack for the Acatenango Volcano Hike

What the Acatenango Hike is Actually Like
Right, here’s the part where I stop giving you a guide and just tell you exactly what happened.
The Journey to the Trailhead
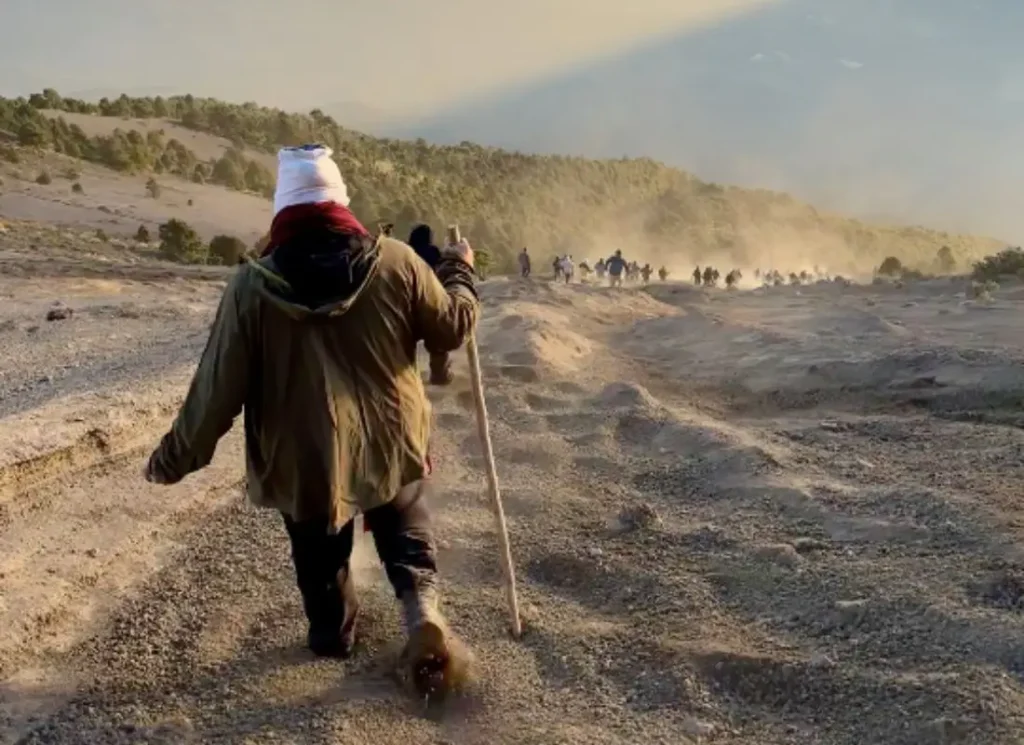
Most tours do a round trip from Antigua, picking up from hostels and stopping to collect kit and food parcels before dropping everyone at the trailhead. At the starting point you can rent walking poles from locals, use the bathroom, and shuffle nervously with all the other groups about to start. There are usually a lot of people setting off at similar times, which is oddly reassuring.
The Main Hike Up to Base Camp
The first part of the hike is the hardest. I know everyone says that, but I want you to really believe it. The trail starts steep and exposed, in full midday sun, at an altitude that already has your lungs working overtime. I had been warned that the first two hours were the worst, and knowing that genuinely helped me push through them.
The tour stops for 10-20 minutes every 30-40 minutes or so. There are six or seven sections like this before you reach base camp. About halfway up there’s a longer lunch break, and after the second rest stop the trail gets some tree cover from the tropical cloud forest, which is a significant relief.
From around two thirds of the way up, the gradient eases off, and the final stretch before base camp is almost flat. Then, just when you think you’ve made it, you hit a wall of deep volcanic sand for the last ten minutes. It’s like trying to climb a sand dune. Pure suffering. But base camp is right there.
The hike takes most people 4-6 hours to reach base camp.
One thing worth knowing: hiking in a guided group means you’re moving at the group’s pace, not your own. Anyone struggling and falling behind would arrive at rest stops later but still have to leave at the same time as everyone else. The guides kept a steady pace that suited most people, but it’s worth being aware of.
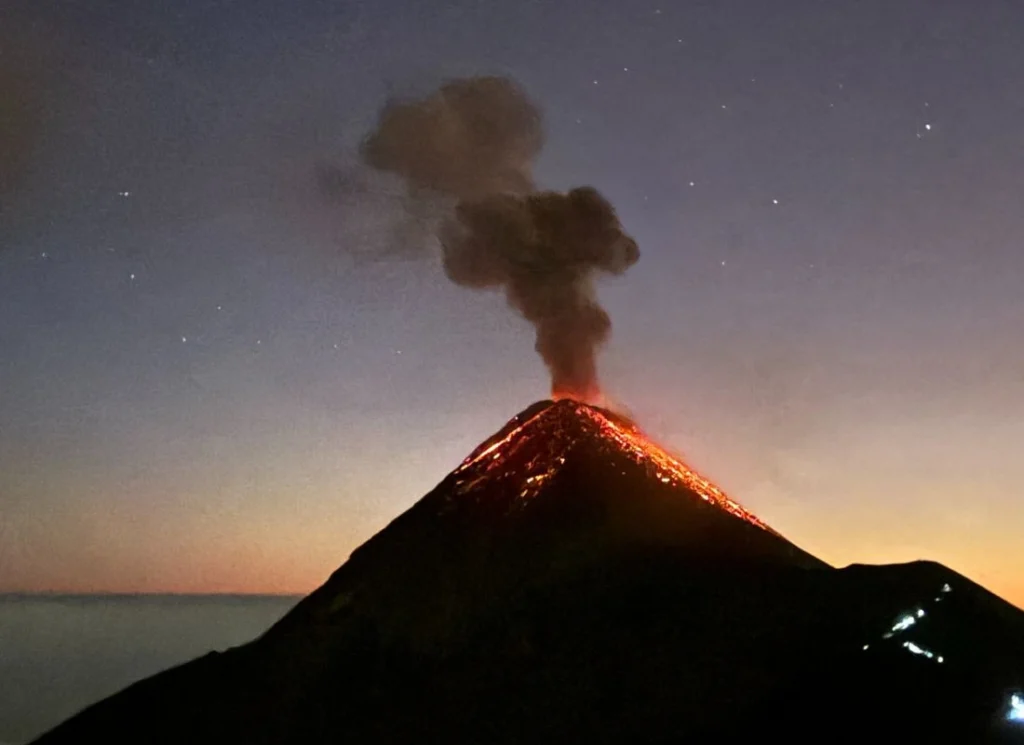
We were one of the later groups to set off, so we arrived at base camp around sunset. Just in time to watch Volcán de Fuego erupting from across the valley, which is spectacular even before you’ve done any additional hikes. We had pasta for dinner and were asleep by 9pm.
The Fuego Hike (Optional)
Around half the people in our group decided to do the Fuego hike, an optional extra that takes you onto Volcán de Fuego itself. Fuego is one of the most active volcanoes in the world, producing small eruptions constantly, and from Acatenango base camp you can already see them clearly. The Fuego hike gets you much, much closer.
People I know who did it said it was worth it for the views and for the ground shaking beneath your feet as Fuego erupts. It’s only worth it in good weather, though: people in our group who did it in cloud cover said it wasn’t worth the extra effort. It’s also worth knowing that it carries more risk than the main trail, since you’re getting close to an active volcano.
Here’s the thing about the Fuego hike: when our group split up at base camp, I said goodbye to those doing Fuego and told them all I’d see them for the summit hike in the morning. Not a single one of them showed up. The Fuego hike is more demanding than it looks on paper, and most people who do it don’t have the legs for the summit the next morning. Worth keeping in mind when you’re planning your overnight tour.
The Summit Hike (Optional, but Do It)
I hadn’t slept at base camp. Altitude sickness had seen to that. When the guides came to wake us at 3:45am, the temptation to stay horizontal was enormous.
I got up anyway, and I’m so glad I did.
The entire 2-hour hike to the summit of Acatenango is through deep volcanic ash. Two hours of sinking into the ground with every step, in the dark, at a steep incline, at nearly 4,000 metres. It was probably the two most physically demanding hours of hiking I’ve ever done. But it also levels the playing field: even the fit, experienced hikers in our group were moving at a snail’s pace. Nobody’s running up volcanic sand.
I didn’t have a head torch, which I regret. I managed by staying close to other hikers whose torches lit the trail, but if you’re doing the summit hike, take a torch.
Also take water. Being optimistic, I drank a load before setting off and left my bottle at base camp. One of my fellow hikers saved me by sharing theirs. Don’t be me.
We reached the summit just in time for sunrise, and it was worth every step. At nearly 4,000 metres, the views were extraordinary. We stayed for about twenty minutes before the cold drove us back down.
The descent from summit to base camp takes about 30 minutes, because the volcanic sand that almost killed you on the way up turns into the world’s most efficient natural slide on the way down. Pure chaos, genuinely a bit fun.
The Descent
By the time I made it back to base camp after the summit hike, I was in a bad way with altitude sickness. One of my friends who hadn’t done the summit brought me water and breakfast while I sat on the ground trying to convince my legs they still worked. I’m telling you this not to put you off, but so you know what worst case looks like, and it was fine. I recovered, we started the descent, and the moral was high.
The descent takes 3-4 hours and is harder on your knees than your lungs. Walking poles are your best friend here. The ash and dust also makes the trail slippery, and I fell a few times because my hiking shoes were past their best. We were back at the trailhead by around 11am and waited for the minivans to take us back to Antigua.
Mistakes to Avoid on the Acatenango Hike
Based on my own experience (and some tips from people I spoke to on the trail):
Don’t take altitude sickness medication without reading the side effects first. Diamox is a diuretic, so factor that in before you take it and decide if it’s worth sacrificing a night of undisturbed sleep for..!
Get walking poles: This was the best piece of advice I got before I started the trek. People who didn’t have them were literally on their hands and knees during the summit hike, and they definitely helped me out a tonne. You can rent them at the trailhead for around 50Q.
Don’t try to do both the Fuego hike and the summit hike unless you’re very fit and have hiked at high altitude before. Most people have to choose one or the other; even those who planned to do both ended up bailing on the summit hike after using up all their energy on Fuego. I did meet a few people that did both, but they’re the exception not the rule!
Don’t leave your water bottle at base camp before the summit hike. (Ask me how I know.)
Don’t forget a head torch if you’re planning to do the summit hike. It’s pitch black, the trail is not lit, and there are a lot of obastacles.
Don’t book the very cheapest tour without checking what’s included. The entrance fee and Fuego surcharge can add 300Q on top of a headline price.
Acatenango Volcano Hike FAQs
How long does the Acatenango Volcano hike take?
Most tours are two days and one night. The ascent to base camp takes 4-6 hours. The optional Fuego hike adds another 2-3 hours. The summit hike starts at around 3:45am and takes 2 hours up and 30 minutes down. The descent back to the trailhead takes 3-4 hours. You’re usually back in Antigua by midday on day two.
How difficult is the Acatenango overnight hike?
It’s rated hard on AllTrails, and that’s fair. The challenge comes from the steep incline and the altitude gain (from 2,200m to 3,976m), not from any technical difficulty. No special skills or equipment are needed. Anyone with a solid base fitness level and the determination to push through the first two hours can make it to base camp. The summit hike is significantly harder due to two hours of deep volcanic ash.
Can I do the Acatenango hike as a day hike?
Technically possible, but very rare and not recommended. The overnight format gives you time to acclimatise at base camp and lets you watch Volcán de Fuego erupt in the dark, which is the main event. Going up and straight back down in a single day is a very long, hard day with none of the best parts.
Is Volcán de Fuego dangerous to hike?
There’s inherent risk in hiking on an active volcano. Fuego is one of the most active volcanoes in the world, and a major eruption in 2018 killed hundreds of people in a nearby town. Tour operators assess conditions before sending groups out, but it’s worth understanding the risk before you sign up for the Fuego hike.
What is the best time of year to hike Acatenango?
The dry season (November to April/May) gives you the best chance of clear skies, good views of Fuego erupting, and a visible sunrise from the summit. The rainy season (May to October) means muddier trails, cloud cover, and a higher chance of a miserable experience.
Do I need a guide for the Acatenango hike?
It’s possible to hike without a guide, but I wouldn’t recommend it, especially if it’s your first time hiking at high altitude in Central America. Guided tours handle logistics, provide equipment and food, and ensure nobody gets lost in the dark at 4am.
How should I acclimatise before the Acatenango hike?
Stay at least 48 hours above 1,500 metres before you start. Antigua sits at around 1,500 metres, so spending two to three days there before the hike is ideal. Avoid alcohol the day before, stay hydrated, and don’t overexert yourself in the days leading up to it.
What should I pack for the Acatenango overnight hike?
The essentials are walking poles, warm layers (including hat, gloves and scarf), a buff or bandana, a head torch, snacks, rehydration sachets, and toilet paper. Sleeping bags and tents are provided. For a full kit list, see my dedicated packing guide.